
Affiliate Disclosure: This article contains affiliate links. We may earn a commission at no extra cost to you.
🏆 What You Need to Get Started
🌟 Starter Kit (Recommended): Philips Hue Color Starter Kit – Includes bridge + 4 bulbs, everything you need ($200)
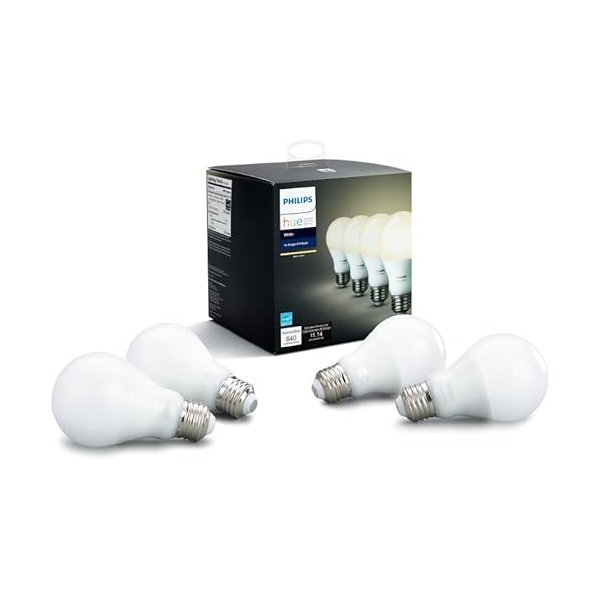
💡 Individual Bulbs: Philips Hue White Bulbs – Budget-friendly white light only ($15/bulb)
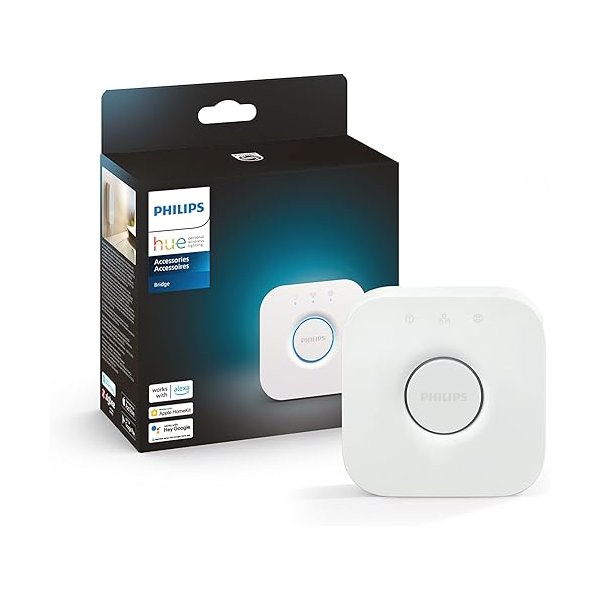
🌈 Hue Bridge: Philips Hue Bridge – Required for full features, voice control, and automation ($60)
Shopping List:
Essential:
• Hue Bridge ($60) – The brains of your system
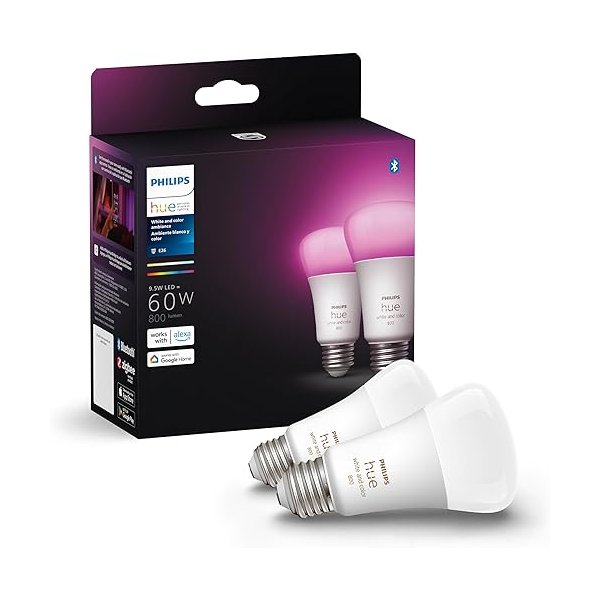
• Hue Color Bulbs ($50/each) – 16M colors, full control
Optional Add-ons:
• Hue Lightstrip ($80) – Accent lighting behind TV/desk
Want to transform your home with smart lighting but not sure where to start? Setting up Philips Hue is easier than you might think, even if you’ve never used smart home technology before. Philips Hue has been the gold standard in smart lighting for years, offering everything from color-changing bulbs to outdoor fixtures. In this comprehensive guide, you’ll learn exactly how to set up Philips Hue from unboxing to your first automated lighting scene. Whether you’re adding a single bulb or outfitting your entire home, we’ll walk you through each step with clear instructions that anyone can follow. Let’s get your smart lighting up and running in under 30 minutes.
What You Need Before You Start
Before diving into the setup process, let’s make sure you have everything ready. This preparation will save you time and frustration later.
Required Equipment
At minimum, you’ll need a Philips Hue bulb or light fixture and a way to control it. Most users choose the Philips Hue Bridge, which unlocks the full feature set, but Bluetooth-enabled Hue bulbs can work without one for basic control. You’ll also need a smartphone (iOS or Android) with the Philips Hue app installed, available free from the App Store or Google Play. If you’re using the Bridge, you’ll need an available ethernet port on your Wi-Fi router and a power outlet nearby.
Bluetooth vs. Bridge Setup: Which Do You Need?
This is the most common question for Hue beginners, and the answer depends on your needs and budget. Bluetooth-enabled Hue bulbs let you control up to 10 lights directly from your phone without any additional hardware. This option costs less upfront and works great for a single room. However, you can’t control lights when away from home, create advanced automations, or integrate with most smart home platforms. The Hue Bridge costs around $60 but unlocks the complete Philips Hue experience. You can control up to 50 lights, access lights remotely from anywhere, create sophisticated automations, and integrate with Amazon Alexa, Google Home, Apple HomeKit, and other platforms. According to user reviews, most people who start with Bluetooth eventually upgrade to the Bridge.
How to Set Up Philips Hue With the Bridge (Recommended)
The Bridge setup is straightforward and takes about 15-20 minutes from start to finish.
Step 1: Install Your Bulbs
Turn off the power to your light fixtures at the wall switch. Screw in your Philips Hue bulbs just like regular bulbs—they fit standard E26/E27 sockets. Once installed, turn the wall switch back on and leave it on (this is important, as smart bulbs need constant power). Your bulbs should light up. If they don’t, check that they’re seated properly and that the fixture has power.
Step 2: Connect the Hue Bridge
Take your Hue Bridge out of the box and plug the included ethernet cable into any available port on your Wi-Fi router. Connect the power adapter to the Bridge and plug it into a wall outlet. Wait about 60 seconds for the three lights on top of the Bridge to illuminate. When all three are lit, your Bridge is ready to connect.
Step 3: Download and Open the Hue App
Download the “Philips Hue” app from the App Store or Google Play. The app has evolved significantly over the years and now offers an intuitive interface that guides you through setup. Open the app and tap “Set up” when prompted. The app will search for your Bridge automatically.
Step 4: Connect to Your Bridge
When the app finds your Bridge, tap on it to connect. You’ll be prompted to press the large round button on top of the Bridge—this is a security measure to ensure someone else isn’t trying to access your system. Press the button once and return to your phone. The app will establish the connection within a few seconds.
Step 5: Add Your Lights
The app will now search for Philips Hue bulbs on your network. This typically takes 30-60 seconds. All powered-on bulbs should appear in the app automatically. Give each light a descriptive name based on its location—“Living Room Lamp,” “Bedroom Ceiling,” etc. This makes voice control and automation much easier later.
Step 6: Assign Rooms and Zones
Organize your lights into rooms within the app. This allows you to control multiple lights simultaneously with commands like “turn off bedroom lights.” You can also create zones that span multiple rooms, like “Downstairs” or “Whole House,” for broader control.
Step 7: Create Your First Scene
Scenes are preset lighting configurations you can activate instantly. The app includes pre-made scenes like “Energize,” “Relax,” and “Concentrate,” each designed for different moods and activities. Try a few scenes to see how they transform your space. You can also create custom scenes with your own color and brightness preferences.
How to Set Up Philips Hue With Bluetooth (No Bridge)
If you’re starting with Bluetooth-only control, the process is even simpler but with some limitations.
Quick Bluetooth Setup Steps
Install your Bluetooth-enabled Hue bulbs in your fixtures and turn on the power. Open the Philips Hue Bluetooth app (different from the main Hue app for Bridge users) and tap “Add lights.” Hold your phone close to the bulbs—within a few feet works best. The app will discover them automatically. Follow the on-screen prompts to name your lights and assign them to rooms. Remember, you can only control these lights when your phone is within Bluetooth range (about 30 feet) and you can’t access them remotely or through most voice assistants without a Bridge.
Connecting Philips Hue to Smart Home Platforms
Once your basic setup is complete, connecting to voice assistants and smart home platforms expands what you can do with your lights.
Amazon Alexa Integration
Open the Alexa app and tap “Devices,” then the plus icon to add a device. Select “Light,” then “Philips Hue.” The app will discover your Bridge automatically if you’re on the same network. Once connected, you can say things like “Alexa, dim the living room lights to 50%” or “Alexa, turn the bedroom lights blue.” According to user feedback, Alexa offers one of the smoothest Hue integrations available.
Google Home Integration
In the Google Home app, tap “Add,” then “Set up device,” then “Works with Google.” Search for Philips Hue and follow the prompts to link your account. Google Assistant commands work similarly: “Hey Google, turn on the kitchen lights” or “Hey Google, set the bedroom to warm white.”
Apple HomeKit Setup
If you purchased a HomeKit-compatible Hue Bridge (most recent versions are compatible), you can add it to the Apple Home app. Open Home, tap the plus icon, and select “Add Accessory.” Scan the HomeKit code on the bottom of your Bridge or enter it manually. Your Hue lights will appear in the Home app for control via Siri and HomeKit automations.
Essential Philips Hue Settings and Features
Now that your basic setup is complete, let’s optimize your system for the best experience.
Setting Up Routines and Automations
Automations turn your smart lights into truly hands-free lighting. Create a “Wake Up” routine that gradually brightens your bedroom lights at sunrise. Set up a “Good Night” automation that turns off all lights at bedtime. The Hue app offers time-based automations, sunrise/sunset triggers, and even location-based automations that turn lights on when you arrive home. These features require the Bridge but are widely regarded as game-changers for daily convenience.
Optimizing Light Placement
The positioning of your smart bulbs matters more than you might think. Color bulbs create the most impact in visible fixtures like floor lamps and pendant lights. White ambiance bulbs work well in ceiling fixtures and task lighting. Consider placing at least one color bulb in your most-used room first—user reviews consistently mention that seeing the full color range helps people understand the value of smart lighting.
Power Loss Settings
By default, Hue bulbs return to full brightness when power is restored after an outage. You can change this behavior in the app under Settings > Power-on Behavior. Most users prefer setting bulbs to return to their last state or a dim warm white, preventing blinding lights at 3 AM when power flickers.
Choosing the Right Philips Hue Products for Your Setup
Philips offers dozens of Hue products, which can feel overwhelming for beginners. Here’s what you need to know about the core options.
Starter Kits Comparison
| Kit | What’s Included | Price | Best For |
|---|---|---|---|
| White Starter Kit | 2 white bulbs + Bridge | ~$90 | Budget-conscious users wanting dimming |
| White Ambiance Starter Kit | 2 white ambiance bulbs + Bridge | ~$130 | Those wanting warm-to-cool color temperature |
| Color Starter Kit | 3 color bulbs + Bridge | ~$180 | Full smart lighting experience |
According to product specifications and user reviews, the Color Starter Kit offers the best value for most users. While it costs more upfront, the color-changing capability proves more valuable than many beginners expect.
Individual Bulb Options
White Bulbs ($15 each): Dimmable white light only. These work well for closets, bathrooms, or anywhere you just need simple on/off and dimming control.
White Ambiance ($25 each): Adjustable from warm candlelight to cool daylight. Popular for bedrooms and offices where color temperature affects mood and productivity.
Color Bulbs (~$50 each): The full spectrum of 16 million colors plus all white tones. Based on user feedback, these are worth the investment for living rooms and entertainment areas.
Beyond Bulbs: Other Hue Products
Philips has expanded the line significantly beyond basic bulbs. The Hue Light Strip ($80) offers colorful accent lighting for behind TVs or under cabinets. The Hue Go portable lamp ($80) provides wireless color lighting anywhere in your home.
Outdoor options include floodlights, wall lights, and pathway lights, all controllable through the same app and system. User reviews particularly praise the durability of outdoor Hue products.
Troubleshooting Common Setup Issues
Even with straightforward instructions, you might encounter a few hiccups. Here are solutions to the most common problems.
Lights Not Appearing in the App
If your bulbs don’t show up during setup, first verify they’re powered on—check the wall switch. Make sure you’re within range of the Bridge or, for Bluetooth setup, close to the bulbs. Try power cycling the bulb: turn it off for 10 seconds, then back on. The app should detect it on the next search. If a bulb was previously used in another Hue system, you may need to reset it first.
How to Reset Philips Hue Bulbs
The easiest reset method requires a Hue Dimmer Switch (sold separately), but there’s a workaround without one. Turn the bulb on for 5 seconds, off for 5 seconds, and repeat this cycle 5 times. On the fifth time, leave it on—the bulb should flash, indicating it’s reset. Alternatively, use the Hue app’s “Add Serial Number” feature if you have the bulb’s serial number from the box.
Bridge Connection Problems
If your Bridge won’t connect, verify the ethernet cable is securely plugged into both the Bridge and router. Try a different ethernet port on your router, as some routers have dedicated ports for different functions. Make sure your phone is connected to the same Wi-Fi network as your Bridge. Some users with mesh networks need to temporarily connect to the 2.4GHz band during setup.
Expanding Your Philips Hue System Over Time
Starting with a few bulbs and growing your system is a smart approach that spreads out costs and helps you learn what you actually need.
Cost-Effective Expansion Strategy
Begin with 2-3 bulbs in your most-used space—typically the living room or bedroom. Live with this setup for a few weeks to understand how you use smart lighting. Next, add lights to secondary areas like hallways or bathrooms. These don’t necessarily need color bulbs; white ambiance options work well and cost less. Save your budget for color bulbs in spaces where you entertain or relax. According to user experiences shared in reviews, most people settle on 10-15 bulbs total for a medium-sized home, finding that sweet spot between comprehensive coverage and manageable cost.
Compatible Third-Party Accessories
You’re not limited to Philips products. The Hue ecosystem works with switches, sensors, and bulbs from other manufacturers that use the Zigbee protocol. The Lutron Aurora dimmer (~$40) is highly rated for adding physical control over smart bulbs. Third-party motion sensors from brands like Samsung SmartThings can trigger your Hue lights, though compatibility varies.
Frequently Asked Questions
Do Philips Hue bulbs work without WiFi?
Yes and no. Bluetooth-enabled Hue bulbs work directly with your phone via Bluetooth, requiring no WiFi. However, the Hue Bridge requires an internet connection for remote access and most integrations. Local control through the Bridge still works if your internet goes down, but cloud features won’t.
Can I use Philips Hue bulbs in any fixture?
Philips Hue bulbs work in any fixture that accepts standard bulb sizes (E26 in North America, E27 in Europe). However, avoid using them in enclosed fixtures unless the bulb specifically states it’s rated for that use—heat buildup can shorten lifespan. Also skip using them with dimmer switches, as smart bulbs need constant full power.
How many Hue bulbs can I connect to one Bridge?
A single Hue Bridge supports up to 50 Philips Hue lights and 12 accessories (like switches and sensors). For homes needing more coverage, you can add a second Bridge, though most households find 50 lights more than sufficient.
Do Philips Hue bulbs use a lot of electricity when off?
Hue bulbs consume approximately 0.5 watts in standby mode to maintain their smart connection. Over a year, this amounts to roughly $0.50-$1.00 per bulb depending on your electricity rates—a negligible cost for the convenience of smart control.
Can I control Philips Hue lights away from home?
Only if you’re using the Hue Bridge. The Bridge connects to your home internet and enables remote access through the Hue cloud service. Bluetooth-only setups require you to be within Bluetooth range (about 30 feet) of your bulbs.
Conclusion
Setting up Philips Hue is a straightforward process that most people complete in under 30 minutes. Start with a starter kit that includes the Bridge for the most flexibility, install your bulbs, connect everything through the intuitive app, and you’ll be enjoying smart lighting immediately. The Bridge setup offers the best experience for most users, providing remote access, extensive automations, and integration with all major smart home platforms. While Bluetooth-only setup costs less initially, the limitations often lead to Bridge purchases down the road anyway. Take your time experimenting with scenes and automations—this is where Philips Hue transforms from “neat gadget” to genuinely useful home upgrade. Most users report that smart lighting changes how they interact with their homes more than any other smart home technology. Ready to expand your smart home? Check out our guides on [setting up smart thermostats] and [choosing the best smart home hub for beginners] to continue building your connected home.